
springBoot Web开发
静态资源
WebMvcAutoConfiguration类中有这样一个方法
public void addResourceHandlers(ResourceHandlerRegistry registry) {
    if (!this.resourceProperties.isAddMappings()) {
        logger.debug("Default resource handling disabled");
    } else {
        Duration cachePeriod = this.resourceProperties.getCache().getPeriod();
        CacheControl cacheControl = this.resourceProperties.getCache().getCachecontrol().toHttpCacheControl();
        if (!registry.hasMappingForPattern("/webjars/**")) {
            this.customizeResourceHandlerRegistration(registry.addResourceHandler(new String[]{"/webjars/**"}).addResourceLocations(new String[]{"classpath:/META-INF/resources/webjars/"}).setCachePeriod(this.getSeconds(cachePeriod)).setCacheControl(cacheControl));
        }

        String staticPathPattern = this.mvcProperties.getStaticPathPattern();
        if (!registry.hasMappingForPattern(staticPathPattern)) {
            this.customizeResourceHandlerRegistration(registry.addResourceHandler(new String[]{staticPathPattern}).addResourceLocations(WebMvcAutoConfiguration.getResourceLocations(this.resourceProperties.getStaticLocations())).setCachePeriod(this.getSeconds(cachePeriod)).setCacheControl(cacheControl));
        }

    }
}
第一种方式
可以看到其中有一个/webjars/**
我们可以在pom.xml中添加如下依赖
<dependency>
    <groupId>org.webjars</groupId>
    <artifactId>jquery</artifactId>
    <version>3.4.1</version>
</dependency>
导入后,可以在依赖目录中找到它的jar包,其中jquery的js文件所在的文件目录是:jquery-3.4.1.jar/META-INF/resources/webjars/jquery/3.4.1,这与上面的方法中的
classpath:/META-INF/resources/webjars/
一致,所以springboot通过这样的方式,将一些静态资源加入了项目
- 启动项目后,可以在浏览器中输入ipaddress:port/webjars/jquery/3.4.1/jquery.js查看这个js文件
- 类似的webjars可以在https://www.webjars.org/ 中找到
第二种方式
可以看到方法中有一个staticPathPattern,它通过WebMvcProperties类中的如下方法获得
public String getStaticPathPattern() {
    return this.staticPathPattern;
}
其中this.staticPathPattern的值是“/**”
后面有一个this.resourceProperties,ResourceProperties类中有
private static final String[] CLASSPATH_RESOURCE_LOCATIONS = new String[]{"classpath:/META-INF/resources/", "classpath:/resources/", "classpath:/static/", "classpath:/public/"};
-
classpath:指resource下
- 可以看到有四个目录,这四个目录下的静态资源都能被识别到
- 故我们在启动项目后,在浏览器中输入ipaddress:port/xxx.xx,便可以访问到该静态资源,上述四个文件夹里的内容都可以被ipaddress:port/的访问接收
- 优先级:classpath:/resources/ > classpath:/static/ > classpath:/public/
第三种方式
可以看到方法中最前面有
if (!this.resourceProperties.isAddMappings()) {
        logger.debug("Default resource handling disabled");
    }
所以,我们一旦在配置文件中设置
spring.mvc.static-path-pattern=/xxx/**
前面的默认路径都会失效,会按我们自己设置的路径走
首页如何定制
WebMvcAutoConfiguration类中有
@Bean
public WelcomePageHandlerMapping welcomePageHandlerMapping(ApplicationContext applicationContext, FormattingConversionService mvcConversionService, ResourceUrlProvider mvcResourceUrlProvider) {
    WelcomePageHandlerMapping welcomePageHandlerMapping = new WelcomePageHandlerMapping(new TemplateAvailabilityProviders(applicationContext), applicationContext, this.getWelcomePage(), this.mvcProperties.getStaticPathPattern());
    welcomePageHandlerMapping.setInterceptors(this.getInterceptors(mvcConversionService, mvcResourceUrlProvider));
    welcomePageHandlerMapping.setCorsConfigurations(this.getCorsConfigurations());
    return welcomePageHandlerMapping;
}

private Optional<Resource> getWelcomePage() {
    String[] locations = WebMvcAutoConfiguration.getResourceLocations(this.resourceProperties.getStaticLocations());
    return Arrays.stream(locations).map(this::getIndexHtml).filter(this::isReadable).findFirst();
}

private Resource getIndexHtml(String location) {
    return this.resourceLoader.getResource(location + "index.html");
}
里面出现了
this.mvcProperties.getStaticPathPattern()
getResource(location + "index.html")
所以,如果在那四个路径下存在index.html,就会被ipaddress:port/的访问直解返回浏览器展示
- 在templates目录下的页面,只能通过controller来跳转!
- controller类中的方法的返回值一般为“xxx”,xxx:静态资源名称,也可以加后缀
模板引擎Thymeleaf
模板引擎的作用:
- 我们在后端组装一些数据data,写一个嵌入表达式(模板引擎语法)的html页面
- 模板引擎会把html中的表达式解析,并按相应逻辑将data进行页面填充,最终返回一个填好数据的静态页面
ThymeleafProperties类中有
public static final String DEFAULT_PREFIX = "classpath:/templates/";
public static final String DEFAULT_SUFFIX = ".html";
所以,我们的模板文件必须写在templates目录下,而且必须以html结尾
结论:只要需要使用thymeleaf,只需要导入对应的依赖就可以了
MVC配置原理
Spring Boot为Spring MVC提供了自动配置,可与大多数应用程序完美配合。
自动配置在Spring的默认值之上添加了以下功能:
- 包含
ContentNegotiatingViewResolver和BeanNameViewResolver。 - 支持提供静态资源,包括对WebJars的支持(在本文档的后面部分中有介绍)。
- 自动注册
Converter,GenericConverter和FormatterBean类。 - 支持
HttpMessageConverters(在本文档后面介绍)。 - 自动注册
MessageCodesResolver(在本文档后面介绍)。 - 静态
index.html支持。 - 定制
Favicon支持(在本文档后面部分中介绍)。 - 自动使用
ConfigurableWebBindingInitializerbean(在本文档后面介绍)。
如果要保留这些Spring Boot MVC定制并进行更多的MVC定制(拦截器,格式化程序,视图控制器和其他功能),则可以添加自己的有@Configuration的类,类名为WebMvcConfigurer但不添加 @EnableWebMvc。
如果你想提供的定制情况RequestMappingHandlerMapping,RequestMappingHandlerAdapter或者ExceptionHandlerExceptionResolver,仍然保持弹簧引导MVC自定义,你可以声明类型的BeanWebMvcRegistrations,并用它来提供这些组件的定制实例。
如果你想利用Spring MVC中的完全控制,你可以添加自己的@Configuration注解为@EnableWebMvc,或者添加自己的@Configuration-annotated DelegatingWebMvcConfiguration中的Javadoc中所述@EnableWebMvc。
上面为spring官方文档!
-
扩展MVC:自己写一个类,加
@Configuration类名设置为WebMvcConfigurer -
再加一个
@EnableWebMvc则会全面接管! -
@Configuration public class MyMvcConfig implements WebMvcConfigurer { @Bean public ViewResolver myViewResolver(){ return new MyViewResolver(); } //自定义试图解析器 public static class MyViewResolver implements ViewResolver{ @Override public View resolveViewName(String s, Locale locale) throws Exception { return null; } } } -
SpringBoot在自动配置很多组件的时候,先看容器中有没有自己配置的(如上面,自己写的Bean),如果有就用用户配置的,如果没有就用自动配置的;如果有些组件可以存在多个,比如上面的视图解析器,就会将用户配置的和默认的组合起来
-
除了MVC的自定义配置,其他组件的自定义配,也是类似的这种方式,核心就是@Configuration注解
-
加上@EnableWebMvc注解,会导入一个类DelegatingWebMvcConfiguration(继承WebMvcConfigurationSupport),它的一个作用是从容器中获取所有的webmvcconfig,但在源码中的WebMvcAutoConfiguration
类里有@ConditionalOnMissingBean({WebMvcConfigurationSupport.class}),故在容器中没有WebMvcConfigurationSupport时,WebMvcAutoConfiguration下面的自动配置才会生效,所以当我们加上@EnableWebMvc注解时,自动配置就会失效!
-
自己写一个配置类,只加@Configuration,继承某一配置接口(如WebMvcConfigurer;WebMvcAutoConfiguration类中也有一个继承该接口的内部类WebMvcAutoConfigurationAdapter),实现其中的一个方法,项目启动后,如果有自定义配置类和内部类同时实现的方法自定义配置类中重写的方法会代替自动配置类里对应内置类的对应方法,若没有(自定义类里有,内部类没有)这个方法会新增到配置,而其余的方法则依然按自动配置类里内部类的方法来为项目进行相关配置
@Configuration public class WebMVCConfig implements WebMvcConfigurer { @Override public void addResourceHandlers(ResourceHandlerRegistry registry) { registry.addResourceHandler("/**").addResourceLocations("classpath:/aaa/"); } } -
如上,在项目中写这样一个WebMVCConfig类,作用是代替本文中的第一段代码的方法
-
在任意有@Configuration注解的类中可以用@Bean的方式向类工厂添加实例,如下:
@Configuration public class testConfig { //注入自定义国际化组件 @Bean public LocaleResolver localeResolver(){ return new MyLocaleResolver(); } } -
MyLocaleResolver是自定义的继承LocaleResolver的类,WebMvcAutoConfiguration类中也有继承LocaleResolver的类,而我们这样做的效果就是我们自定义的组件成功装配了
- 【推论】:SpringBoot项目启动后,会先加载自动配置类,把类中的各种Bean装入工厂中,然后会扫描我们自己写的所有类文件以及配置文件,根据配置文件及自定义@Configuration类中重写的方法修改工厂中Bean的内容,再把我们自己写的@Configuration类下的组件也装配进工厂
注意
SpringBoot中,有非常多的xxxx Configuration帮助我们进行扩展配置,看到这些类,就要注意了!
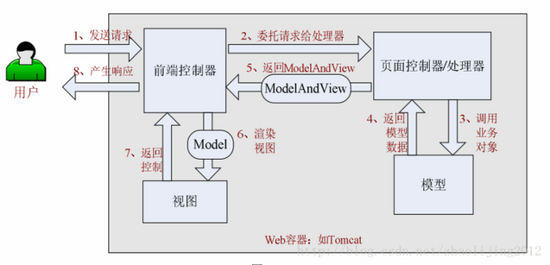
SpringMVC整体流程:
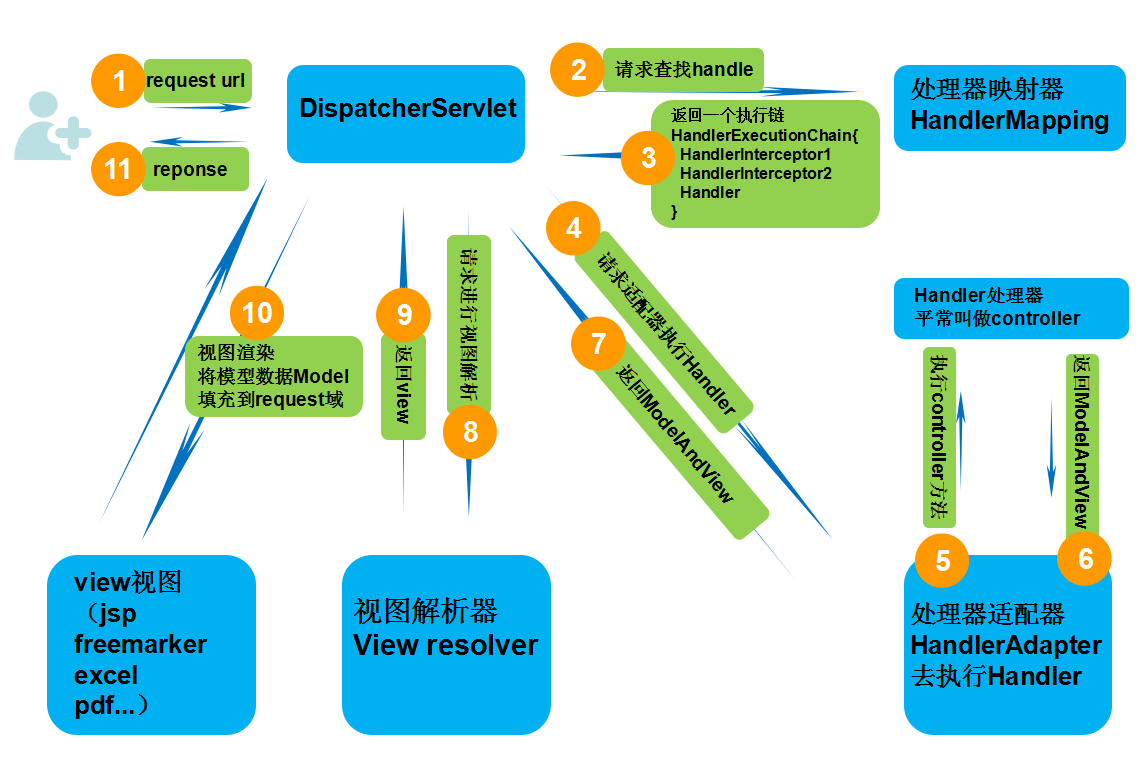
SpringMVC详细流程:
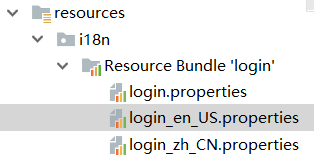
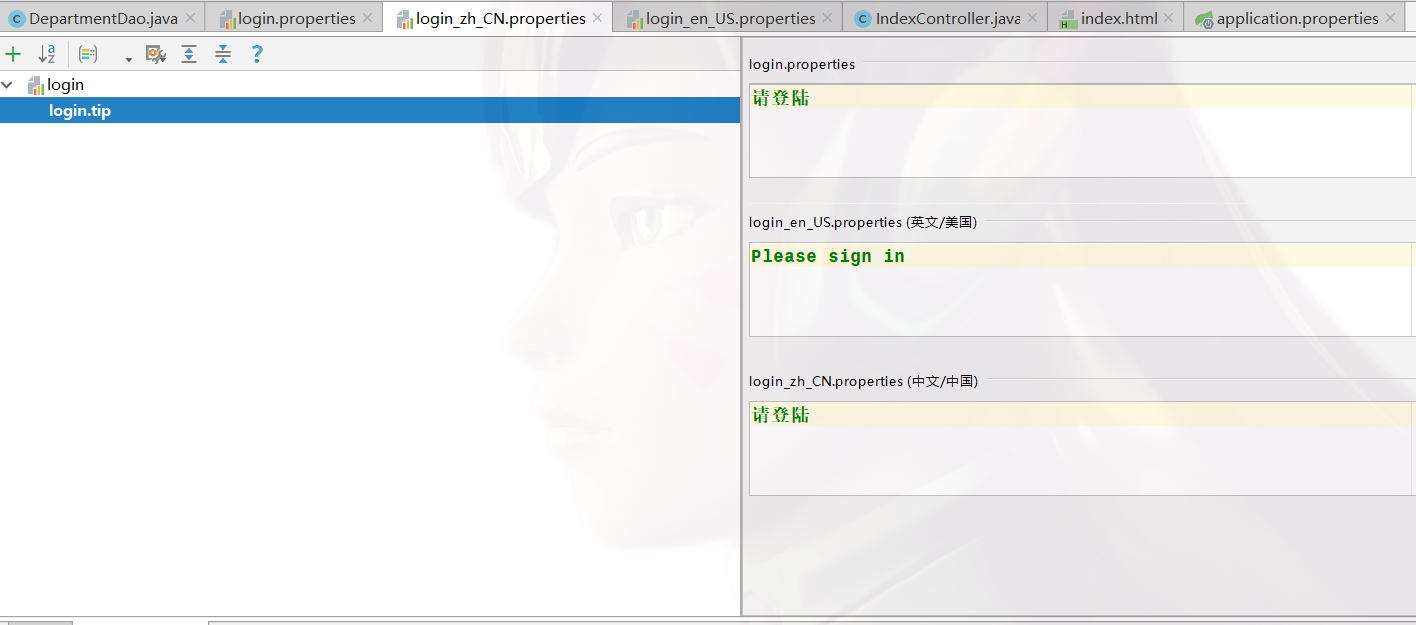
页面国际化
-
建立这些文件
-
-
这样操作
-
-
配置文件中写spring.messages.basename=i18n.login;
-
<h1 class="h3 mb-3 font-weight-normal" th:text="#{login.tip}">Please sign in</h1> <input type="text" class="form-control" th:placeholder="#{login.username}" required="" autofocus=""> <input type="password" class="form-control" th:placeholder="#{login.password}" required=""> - html文件中如上方式去写,这样页面就会根据请求头中的Accept-Language的值,去给用户返回相应语言的页面
WebMvcAutoConfiguration类下有:
@Bean
@ConditionalOnMissingBean
@ConditionalOnProperty(
    prefix = "spring.mvc",
    name = {"locale"}
)
public LocaleResolver localeResolver() {
    if (this.mvcProperties.getLocaleResolver() == org.springframework.boot.autoconfigure.web.servlet.WebMvcProperties.LocaleResolver.FIXED) {
        return new FixedLocaleResolver(this.mvcProperties.getLocale());
    } else {
        AcceptHeaderLocaleResolver localeResolver = new AcceptHeaderLocaleResolver();
        localeResolver.setDefaultLocale(this.mvcProperties.getLocale());
        return localeResolver;
    }
}
- 我们有自定义的继承LocaleResolver的配置类时,就会用我们自定义的,否则就用默认的
我们自定义一个
public class MyLocaleResolver implements LocaleResolver {
    //解析请求
    @Override
    public Locale resolveLocale(HttpServletRequest httpServletRequest) {
        //获取请求中的请求参数
        String language = httpServletRequest.getParameter("l");
        //如果没有就使用默认的
        Locale locale = Locale.getDefault();
        //如果请求的连接携带了地区参数
        if(!StringUtils.isEmpty(language)){
            String[] split = language.split("_");
            //国家,对象
            locale = new Locale(split[0],split[1]);
        }
        return locale;
    }

    @Override
    public void setLocale(HttpServletRequest httpServletRequest, HttpServletResponse httpServletResponse, Locale locale) {

    }
}
并在配置类中以@Bean的方式注入容器
@Configuration
public class MyMvcConfig implements WebMvcConfigurer {

    //注入自定义国际化组件
    @Bean
    public LocaleResolver localeResolver(){
        return new MyLocaleResolver();
    }
}
于html页面设置如下
<a class="btn btn-sm" th:href="@{/index.html(l='zh_CN')}">中文</a>
<a class="btn btn-sm" th:href="@{/index.html(l='en_US')}">English</a>
即可实现页面内容语言切换的功能!
自定义拦截器
@Configuration
public class MyMvcConfig implements WebMvcConfigurer {
    //登陆拦截器
    @Override
    public void addInterceptors(InterceptorRegistry registry) {
        registry.addInterceptor(new LoginHandlerInterceptor())
                .addPathPatterns("/**")
             .excludePathPatterns("/index.html","/","/user/login","/css/**","/js/**","/img/**");
    }
}
LoginHandlerInterceptor类
public class LoginHandlerInterceptor implements HandlerInterceptor {
    @Override
    public boolean preHandle(HttpServletRequest request, HttpServletResponse response, Object handler) throws Exception {

        //登陆成功之后,应该有用户的session
        Object loginUser = request.getSession().getAttribute("loginUser");

        if(loginUser == null){//没有登陆
            request.setAttribute("msg", "没有权限,请先登录");
            request.getRequestDispatcher("/index.html").forward(request,response);
            return false;
        }else {
            return true;
        }

    }
}
Controller
@Controller
public class LoginController {

    @RequestMapping("/user/login")
    public String login(@RequestParam("username")String username,
                        @RequestParam("password")String password,
                        Model model, HttpSession session){
        if(!StringUtils.isEmpty(username) && "123456".equals(password)){
            session.setAttribute("loginUser", username);
            return "redirect:/main.html";
        }else {
            model.addAttribute("msg","用户名或密码错误!");
            return "index";
        }

    }
}
时间日期格式化
spring.mvc.format.date=dd/MM/yyyy
spring.mvc.format.date=dd-MM-yyyy
设置后,前端表单传参需按设置的格式写,String才能转换为Date,否则会报错
SpringMvc封装参数
前台传后台: 把需要传递的参数放到控制器方法上(参数方式),当需要访问这个方法时,方法里面的对象会被自动创建,需要封装的参数自动封装到方法对象中。
前端:
<form th:action="@{/emp}" method="post">
   <div class="form-group">
      <label>LastName</label>
      <input type="text" name="lastName" class="form-control" placeholder="lastName">
   </div>
   <div class="form-group">
      <label>Email</label>
      <input type="email" name="email" class="form-control" placeholder="email">
   </div>
   <div class="form-group">
      <label>Gender</label><br/>
      <div class="form-check form-check-inline">
         <input class="form-check-input" type="radio" name="gender" value="1">
         <label class="form-check-label">男</label>
      </div>
      <div class="form-check form-check-inline">
         <input class="form-check-input" type="radio" name="gender" value="0">
         <label class="form-check-label">女</label>
      </div>
   </div>
   <div class="form-group">
      <label>department</label>
      <select class="form-control" name="departmen.id">
         <option th:each="dept:${departments}" th:text="${dept.getDepartmentName()}" th:value="${dept.getId()}"></option>
      </select>
   </div>
   <div class="form-group">
      <label>Birth</label>
      <input type="text" name="birth" class="form-control" >
   </div>
   <button type="submit" class="btn btn-primary">添加</button>
</form>
后端:
@PostMapping("/emp")
public String addEmp(Employee employee){
    employeeDao.save(employee);
    return "redirect:/emps";
}
-
SpringMVC会将前端name属性的值作为参数,value属性的值做为参数的值,自动调用Employee类的构造方法,创建一个employee对象
-
如果没有SpringMVC,就需要我们手动request.getParameter(); 使用HttpRequest对象自己获取表单参数。
而SpringMVC根据方法上的参数类型自动创建相应对象。当然,Employee类中属性的名称要与表单的name属性的值一致!!